Aspheric Myths Part 2
Precision and production myths
Content
Aspheric production has undergone an enormous development in the areas of manufacturing and metrology. Nevertheless, there are many rumors about this special type of lens, for example that aspheres are very expensive and can only be measured with CGHs. Some of these myths have already been addressed in the previous article and we were able to disprove them. In the following, we will focus on three more myths about precision and reproducibility.
Myth 5: High-precision surfaces can only be achieved with aspheres, that have slight deviation from the best-fit sphere!
This presumably can be explained by the widespread assumption that the first production step is the manufacturing of the best-fit sphere.
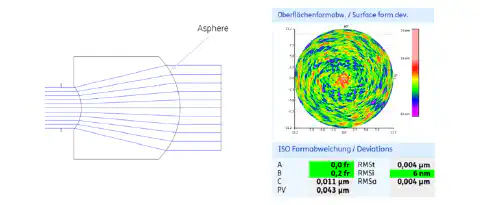
In fact, the shape of the asphere is first produced by CNC-operated grinding. The subsequent polishing process and further processes of high-end finishing ensure the high-precision surface form. Even steep aspheres can be produced with the highest precision using these processes. For example, an RMSi of 6 nm can be realized for slopes of 42°. The production of lenses with up to 90° slope can currently be realized with an irregularity of 2 fringes.

Fig. 1: Lens drawing and interferogram of the aspheric surface of one a|BeamExpander with a maximum slope of 42°, with a measured RMSi of 6 nm
Myth 6: Aspheres are not feasible for series production!
It is still a common assumption that aspheres are only suitable for laboratory setups, R&D projects or demanding applications.
Using the latest production and metrology know-how, aspheres can be produced in series with stable and reproducible accuracy.
By increasing the lot size, setup costs are evenly divided, resulting in lower unit prices. State-of-the-art machine control and production-related measuring technology lead to an optimization of the production process, which increases the yield and reduces the production time.
Precision aspheres are already used in large quantities in areas such as laser material processing, medical technology, metrology and image processing.
Myth 7: Roughness below Sq=5Å is impossible on aspheric surfaces!
Full-surface processing of flat surfaces and spheres, make roughness of a few Ångström no longer a rarity. Due to the geometry of the asphere, a completely different technology is used in the production process. The so-called subaperture processing can leave high-frequency microstructures on the lens surface. These are the reason why in the past, it was hardly possible to achieve demanding roughness values on aspheres, similar to those of planar surfaces and spheres.
Due to a continuous development of the in-house control software and state-of-the-art production technologies, it is possible to optimize the manufacturing process in such a way that, depending on the lens geometry and material, roughness of Sq=5 Å are possible.
The asphericon Ångström polishing supports users in the UV and high-power laser range to avoid stray light by achieving the lowest surface roughness of 5 Å (Sq according to ISO 10110) on almost all aspheric surfaces.

Fig. 2: Differentiation of various materials according to surface roughness
There are other myths about aspheres that you can refute from your point of view? Send us a message by mail and tell us more myths.
