Interferometric Measurement of Aspheres
Part 2: How does a Fizeau interferometer work?
Content
The first article of this series addressed the detailed description of tactile measuring procedure. The following contribution focuses on the non-contact measurement of aspheres with the help of interferometers, in order to describe optical measuring methods. Interferometers are standard instrument for measuring plane and spherical optical surfaces. In this case, the principle of interference fringes generated by the superimposition of coherent light waves is used to determine information about the surface shape of a test area. Using appropriate measuring sequences, it is also possible to measure aspheric surfaces by means of interferometers. These are explained in more detail below.
Design and function of Fizeau Interferometer
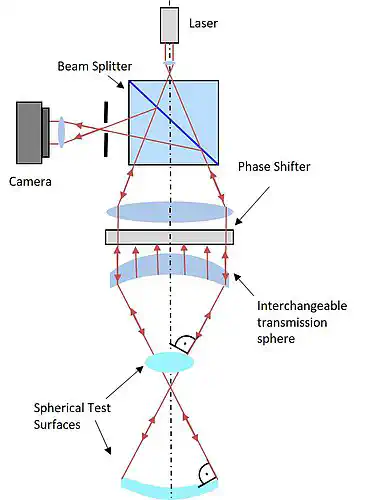
Within the interferometer, two coherent beams, the test beam and the reference beam, are generated by transmission sphere and test object by using a laser source. Interference occurs by superposition of the two coherent beams, thus forming an interference pattern, which is imaged with the camera.
Fig. 1 Simplified structure of a Fizeau Interferometer
Interferometric measurement of a spherical surface
The decisive components of a Fizeau interferometer are the collimated laser source and a interchangeable transmission sphere, the fizeau lense, which generates a spherical wavefront. The spherical surface to be measured is positioned in the beam path in such a way, that the wavefront strikes perpendicularly onto the surface and is reflected. In the interferometer, the beam reflected by the Fizeau surface is overlaid with the one reflected by the test object. The resulting interferogram show a characteristic fringe pattern on the detector. This shows deviations of the test object from the ideal shape. Causing phase shifts between the reflected waves, these deviations result in areas of different intensity in the interferogram. The measurement is repeated using phase-shifting measuring method with several shifts of the transmission sphere. A full-area form deviation of the measurement object is generated from the resulting interferogram.
Importance of the Fizeau lens
The basis of interferometric measurement is the generation of an interferogram by superposition of a test and a reference wave. In order to produce this reference wave, the last optical surface in a Fizeau lens, which is the surface with highest accuracy in the system, is uncoated. The reflected portion of the beam serves as a reference. The R/D of the lens, the quotient of radius of curvature and diameter, has to match the geometry of the test specimen in order to enable a measurement. For this reason, transmission spheres with different F-numbers are offered
Within a customer project asphericon developed a Fizeau transmission sphere which, by using an asphere, is much more compact and lighter than lenses currently available on the market. Due to the intrinsic expansion of the input beam diameter it covers a significantly larger range of measurable test specimens. In addition, the developed Fizeau lens offers the possibility to measure convex lenses with a diameter larger than 4’’ with a 4’’ interferometer. Learn more about customized optical systems from optical design to system integration from asphericon.
Measurement with computer-generated holograms (CGH)
Computer-generated hologram (CGH) has long been the only way to interferometrically measure an asphere. For this purpose, the interferometer is extended by a CGH. This produces an aspherical wavefront in the target shape, which displays the deviation of the test asphere from the ideal asphere in the interferogramm. By means of phase shifts, measurements are repeatedly carried out and superimposed to form the overall surface form deviation.
The advantages of this method are the high reproducibility of the wavefront as well as the high measurement accuracy (λ / 10). However, due to the high acquisition costs, the CGH is only proving to be economical for use in serial production. For each lens type, a separate CGH must be made based on the respective target asphere. For small to medium series this is very expensive. Newer interferometric methods, however, ensure a precise and more economical measurement at the prototype stage.
Interferometric measurement of an asphere
The geometry of an aspheres differs more or less strongly from a sphere, whereby the technique described above can only be applied under certain conditions.
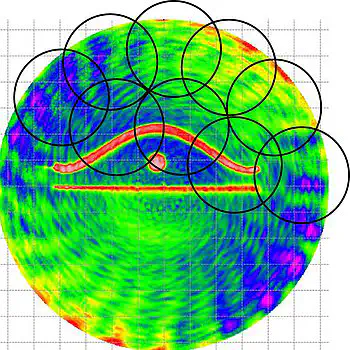
Fig 2. Principal arrangement of the individual measurements in the subaperture stitching
One possibility is a method called subaperture stitching. In this case, the asphere to be measured is divided into small, overlapping test areas as a function of its geometry (see Fig. 2). The results of the individual measurements are subsequently compiled into a full-area error map of the test lens. This technique is used in the measurement of lenses with larger diameters or aspheres with a slight to moderate deviation from spherical shape. An advantage of this method is high flexibility with regard to the measurable surfaces. However, with the number of individual measurements, measurement time and requirements for processing are also increasing.
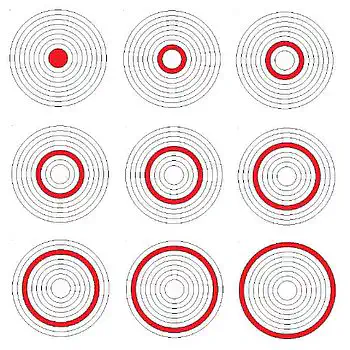
If an asphere is divided into concentric rings, it is possible to describe each of these rings with a best-fit sphere. The method of multizonal interferometry makes perfect use of this. If the test object is moved back and forth along the optical axis in the interferometer, a position can be found for each ring at which the wavefront is perpendicular to a zone of the asphere (see Fig. 3) Depending on the geometry of the aspheres, the measurement is carried out ring by ring. The individual measurements are subsequently arithmetically combined. This method also has a high degree of flexibility with regard to the shape of the test object, but there is a need for a highly accurate measurement of the position of the asphere for each partial measurement.
Fig 3. Individual measurements of multizonal interferometry
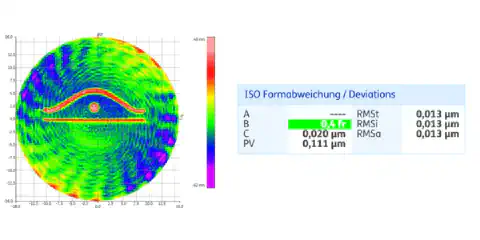
The following interferogram (Fig. 4) shows an exemplary measurement using the Zygo Verifire Asphere ™, a laser interferometer performing multi zonal measurements. A defect with a height of around 50 nm was applied to the lens beforehand, which was imaged perfectly in the interferometer. The measured lens with the logo has an RMSi of 13 nm.
Fig. 4: Measurement example
Limitations of measurement by interferometer
Compared to the tactile measurements, the advantages of the interferometric measurements clearly lie in the absence of direct contact, which prevents possible damage to finished lens surfaces. Another major advantage is the full-area measurement, which is opposed to the creation of individual profiles. However, this method is more time-consuming, so that only a cost-benefit assessment can decide which method should be used. During processing, such as grinding, a control of the lens shape by means of a tactile measured profile is used to suitably adjust the following machining steps. A final check of the finished polished optics is rather interferometric instead of tactile to protect the high-quality surface.
