Aspheric myths – facts and fiction
Geometry, metrology and quality myths
内容
Aspheres are becoming increasingly important and have become standard components in many areas of application. They can be found in photo lenses with high luminous intensity or wide-angle lenses, in endoscopes, magnescope and telescopes, but also in high-tech applications such as aerospace. With the development of modern manufacturing technologies, obsolete assumptions and prejudices about aspheres become myths. We will discuss some of these in the following and show which aspheric myths can be discarded today.
Myth 1: The price of an asphere increases with the deviation from the best-fit sphere!
There is a widespread assumption that the production costs and, thus, the selling price of an aspheric lens increase with the deviation from the best-fit sphere.
In fact, geometry, i. e. the deviation from the best-fit sphere, has no direct influence on production costs. Modern production technologies offer a high degree of flexibility regarding the selection of tools, which significantly increases the range of possible geometries.
In addition to the choice of material and lens diameter, the surface form deviation and the quality of the surface have a much greater influence on manufacturing costs. The specifications of the surface determine which production and measurement strategy are used and therefore the production time. Both are main factors that are reflected in the cost of sales.
Myth 2: Aspheres should not have inflection points!
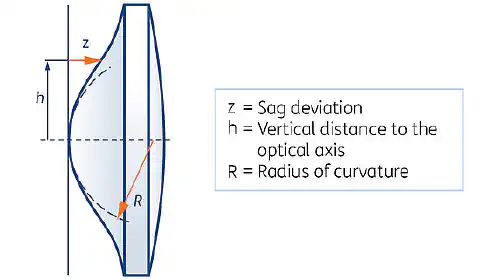
There are cases where a lens design without inflection points will not achieve the desired performance. For a long time, inflections were considered impossible to produce using conventional manufacturing technologies. The interferometric measurement of an asphere with inflection points was also problematic or even impossible.
Thanks to state-of-the-art manufacturing technologies and sophisticated interferometric measuring algorithms, the size of the smallest tool is currently the only limiting factor in the production of geometries with inflection points. Currently the smallest local radius of curvature should not be less than 10 mm. Considering these requirements, the production of aspheric surfaces with inflection points is no more complicated than the production of other concave geometries.
Fig. 1: Representation of an asphere with inflection points
Myth 3: Power and irregularity allow a sufficient definition of the surface form deviation of an aspheric surface!
Power and irregularity are used to specify the surface form deviation of plane and spherical surfaces. Due to full-surface machining processes, a sufficient description is achieved because deviations from the nominal shape occur mainly rotational symmetric and as long-wave errors.
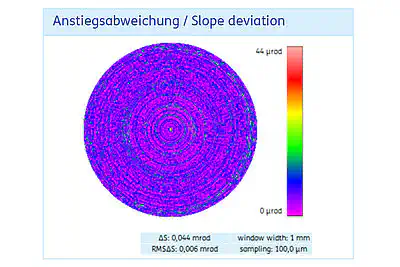
The shape of an asphere requires the manufacturing in subapertures, which means that a relatively small grinding or polishing tool processes parts of the lens surface. The resulting deviations are often not rotational symmetric and tend to be of high frequency.
Fig. 2: Measured slope deviation of an asphere of the a|FizeriC 4 “with R/D 0.55
Therefore, to adequately specify the surface quality of the asphere, power and irregularity are supplemented by slope deviation (RMSΔS).
Myth 4: Interferometric measurements of aspheres are only possible with a CGH!
Interferometers are considered to be standard instruments for the metrology of spherical surfaces. By superimposing a spherical reference beam with the beam reflected by the target, an interference pattern, a so-called interferogram, is created. Deviations of the measuring object from the ideal spherical shape are visible this way.
An asphere differs from spherical shape, so this measuring principle cannot be applied one-to-one to the measurement of aspheres. The spherical wave does not impact normal to the aspheric surface at every point.
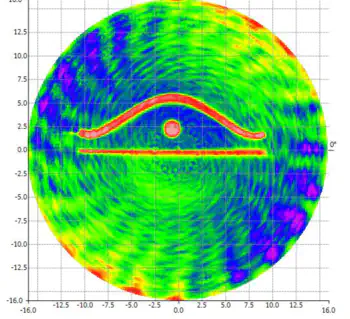
In the past, the only way to interferometrically measure aspheres was using a CGH – computer-generated hologram. The CGH forms a wavefront in the form of the nominal asphere, resulting in an interferogram showing the deviation of the measured object from this shape, after superimposition of the two beams. CGHs are a significant cost factor as they have to be manufactured individually for each lens geometry.
Fig. 3: Interferogram of an asphere
State-of-the-art measuring algorithms and metrology devices provide a remedy for this problem and enable interferometric measurement without having to purchase CGHs. With such aspheric interferometers, it is for the first time possible to interferometrically measure aspheres efficiently and flexibly, especially in small quantities.
Myth 5: High-precision surfaces can only be achieved with aspheres, that have slight deviation from the best-fit sphere!
This presumably can be explained by the widespread assumption that the first production step is the manufacturing of the best-fit sphere.
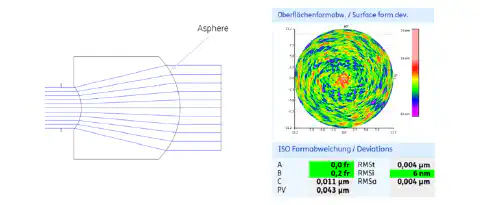
In fact, the shape of the asphere is first produced by CNC-operated grinding. The subsequent polishing process and further processes of high-end finishing ensure the high-precision surface form. Even steep aspheres can be produced with the highest precision using these processes. For example, an RMSi of 6 nm can be realized for slopes of 42°. The production of lenses with up to 90° slope can currently be realized with an irregularity of 2 fringes.
Fig. 4: Lens drawing and interferogram of the aspheric surface of one a|BeamExpander with a maximum slope of 42°, with a measured RMSi of 6 nm
Myth 6: Aspheres are not feasible for series production!
It is still a common assumption that aspheres are only suitable for laboratory setups, R&D projects or demanding applications.
Using the latest production and metrology know-how, aspheres can be produced in series with stable and reproducible accuracy.
By increasing the lot size, setup costs are evenly divided, resulting in lower unit prices. State-of-the-art machine control and production-related measuring technology lead to an optimization of the production process, which increases the yield and reduces the production time.
Precision aspheres are already used in large quantities in areas such as laser material processing, medical technology, metrology and image processing.
Myth 7: Roughness below Sq=5Å is impossible on aspheric surfaces!
Full-surface processing of flat surfaces and spheres, make roughness of a few Ångström no longer a rarity. Due to the geometry of the asphere, a completely different technology is used in the production process. The so-called subaperture processing can leave high-frequency microstructures on the lens surface. These are the reason why in the past, it was hardly possible to achieve demanding roughness values on aspheres, similar to those of planar surfaces and spheres.
Due to a continuous development of the in-house control software and state-of-the-art production technologies, it is possible to optimize the manufacturing process in such a way that, depending on the lens geometry and material, roughness of Sq=5 Å are possible.
The asphericon Ångström polishing supports users in the UV and high-power laser range to avoid stray light by achieving the lowest surface roughness of 5 Å (Sq according to ISO 10110) on almost all aspheric surfaces.
Fig. 5: Differentiation of various materials according to surface roughness
There are other myths about aspheres that you can refute from your point of view? Send us a message by mail and tell us more myths.


